背景
UIButton在日常开发中经常用到,也经常需要做一些定制,这些定制很简单,就是改变image和title的位置而已,默认的image和title位置是这样的: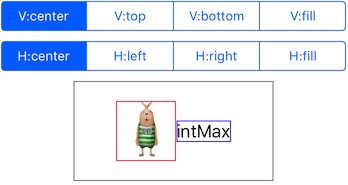
但你拿到的设计稿却经常是这样的: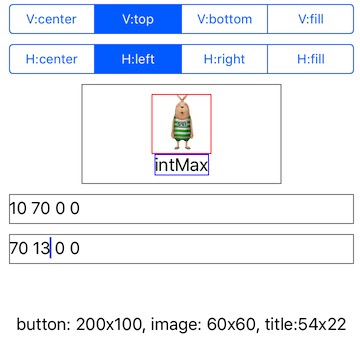
有些朋友可能被“毫无规律”的imageEdgeInsets和titleEdgeInsets虐过,所以用UIImageView和UILabel的组合来代替了。本篇博客希望用最简单粗暴的方式–实验,来了解一下imageEdgeInsets和titleEdgeInsets到底是怎么玩的。这是我实验的Demo,帮你免去了改个数据就要cmd-R的烦恼。
contentVerticalAlignment和contentHorizontalAlignment
这两个属性是UIControl的,是用来排列内部元素的,用好他们,可以让我们的计算轻松一点。先来看看他们的值:typedef NS_ENUM(NSInteger, UIControlContentVerticalAlignment) {
UIControlContentVerticalAlignmentCenter = 0,
UIControlContentVerticalAlignmentTop = 1,
UIControlContentVerticalAlignmentBottom = 2,
UIControlContentVerticalAlignmentFill = 3,
};
typedef NS_ENUM(NSInteger, UIControlContentHorizontalAlignment) {
UIControlContentHorizontalAlignmentCenter = 0,
UIControlContentHorizontalAlignmentLeft = 1,
UIControlContentHorizontalAlignmentRight = 2,
UIControlContentHorizontalAlignmentFill = 3,
};
4x4总共16种选择,只截了其中4种效果,默认是第一种,其他效果自行脑补: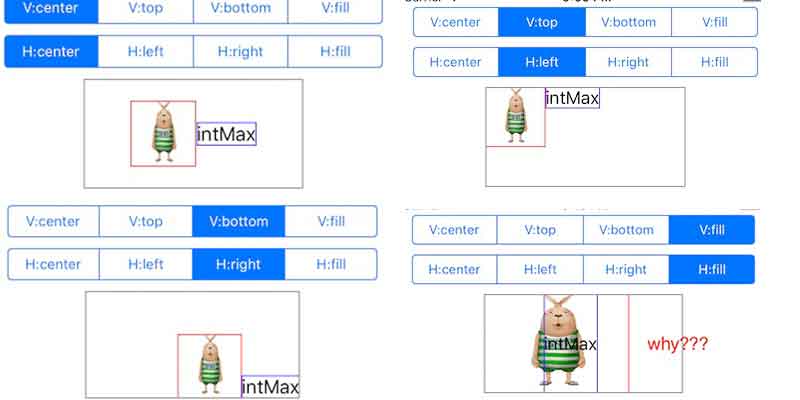
这里有个令人困惑的地方是,为什么选择UIControlContentHorizontalAlignmentFill时,image和title是这种样子的,而不是想象中的填满。这里可以告诉大家,如果只有image时,完全就是大家想象中的样子,如果只有title时,和UIControlContentHorizontalAlignmentLeft的效果一样,都居左,原因是,title不能像图片一样被拉伸,而只能在宽度被偏小时显示...。至于image和title同时存在时,为什么会是这样,在下一节会解释。
接下来说下我个人是怎么来让计算轻松点的吧,我会把contentVerticalAlignment设为top,contentHorizontalAlignment设为left,这样一来就符合了我们以左上角为坐标原点开始布局的惯性思维。当然这只是一种建议,也许有些人觉得从默认状态计算更加方便,我也赞同,毕竟imageEdgeInsets和titleEdgeInsets只是偏移量,和初始位置在哪并没有什么关系。
imageEdgeInsets和titleEdgeInsets
上面说了,我喜欢把Alignment设为left-top,所以我一开始的位置是这样的: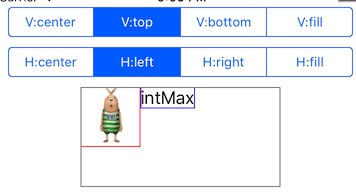
因为在初始状态下,imageEdgeInsets和titleEdgeInsets都是0,所以在计算偏移量时,image的top-left-bottom以及title的top-bottom-right均能以button的边界最为参考,那image的right和title的left到底是以上面为参考呢,其实,image的right还是是button的边界为参考的,而title的left却是以image的left为参考的,这也正解释了上一节的疑问,为什么UIControlContentHorizontalAlignmentFill是那种样子的,具体请看图: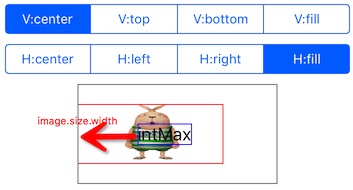
搞清楚了这个以后,我们在实际做一个背景小节中介绍的image在上,title在下的button:CGFloat imageTop = (button.height-image.height-title.height)/2;
CGFloat titleTop = imageTop+image.height;
CGFloat imageLeft = (button.width-image.width)/2;
// 这里减了image.width,因为title的left是以image的left为参考
CGFloat titleLeft = (button.width-title.widht)/2-image.width;
button.imageEdgeInsets = UIEdgeInsetsMake(imageTop, imageLeft, 0, 0);
button.titleEdgeInsets = UIEdgeInsetsMake(titleTop, titleLeft, 0, 0);
还有个问题,不知道大家看出来了没有?虽说left-top就能确定位置,但是不是就说right-bottom就没什么用了呢?像我这里全设为了0。答案是否定的,而且这也牵扯出了另一个问题—约束的优先级。先上个结论:
- top-left-bottom-right取负值 > 不能超出button边界 > imageView不能被压缩
- top-left-bottom-right取负值 > 不能超出button边界 > titleLabel水平方向不能被压缩
- titleLabel垂直方向不能被压缩 > 不能超出button边界
这里的将image和title分开来的原因是这样的:imageView的宽高都能被压缩,titleLabel的宽只能压缩不能拉伸,titleLabel的高只能拉伸不能压缩。从上面三条规则中也能看出,想要超出button边界,只要top-left-bottom-right取负值就行了,当然title在垂直方向上由于不能被压缩,即使是正值也能超出。
接下来拿出实验数据来证明下结论: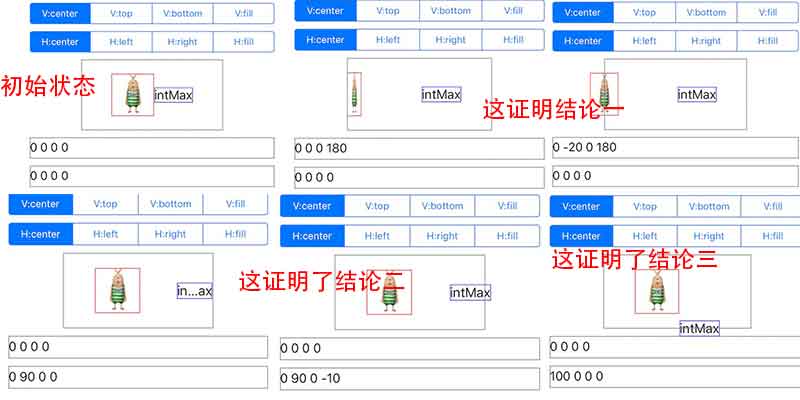
到这里,基本上已经能用好imageEdgeInsets和titleEdgeInsets了,那么还有一个问题,不知道大家注意到没有,title和image是能够超出button边界的,这个其实Apple doc是已经说明说了:
imageEdgeInsets和titleEdgeInsets:
This property is used only for positioning the image during layout. The button does not use this property to determine intrinsicContentSize and sizeThatFits:.
contentEdgeInsets:
The button uses this property to determine intrinsicContentSize and sizeThatFits:.
所以,如果大家想让image和title在设置insets时不超出边界,只需要同时调整下contentEdgeInsets即可。
总结
之前也被imageEdgeInsets和titleEdgeInsets困扰过,就用了UIImageView和UILabel的组合来代替,为了不影响开发进度,也只能这样做,毕竟靠这个吃饭,不过在技术层面,这你能忍?结束。如有问题,请勘误。